Showing posts with label diy. Show all posts

Feb 25, 2012

Obsessed With Headbands: Easy DIY

I love headbands! Usually, I make headbands from scratch, but I couldn't help it when I saw this flower at Michaels!

How to:
Buy the flower
Buy an elastic headband
Hot glue the flower to the headband
Take a piece of felt and glue it to the other side of the headband to hide the elastic behind the flower

See... EASY!

 Headbands look most cute when hair is up in a high bun (at least for me)
<3 Jillian

Feb 17, 2012

How To: Make Your Regular Scarf Into an Infinity Scarf

Hello! When I was obsessed with having to have an infinity scarf, I went to the store and bought one. I didn't realize though, that you can make ANY scarf into an infinity scarf and here's how I did it (lots of pictures, sorry- I went kinda crazy!):

Feb 7, 2012

Valentine's Day-ish Headband Collection

As of tonight, I've finished my Valentine's Day-ish headband collection! I am excited to take some pics and make a look book for these headbands. They are super cute and well... pink-ish! Of course, it's too late to make bundles of these to sell in time for your Valentine's Day date, but they don't just say V-day... they say LOVE as in "I love my headband!" ;)

P.S. yes, they are in bed with me, but don't worry... I just put them away! Look for my LOVE Lookbook coming out soon!


Feb 6, 2012

DIY Valentine's Day Flower Mailbox

For all of those cute Valentine's Day cards your kids are getting, put them all in cute decorative V-day mailboxes! Here, I have done a simple simple DIY to spruce up you $1 mailbox you bought at Target!

What you need:
Fabric
Glue
Mailbox

Twist fabric into flowers and glue them onto your mailbox.

Pin It


Pin It

Happy Valentine's Day!
-Jillian

Jan 31, 2012

Flower Painted Canvas Shoes

So tomorrow is the day that applications open for Firefly Handmade Craft Fair in Boulder, CO. Although around 200 artists apply, only around 60 get in (someone told me). I am really hoping that I can get in because I've heard that this is great place to sell your art. I'm not sure if anyone will be selling what I'm selling, but I'm hoping for the best and rooting for myself!

Here are some flower painted shoes...  Essentially, I'm experimenting with different designs on inexpensive shoes and then when I've picked the various designs, I will then transfer them to better shoes like TOMS. Hey, at least I'd be also doing good for the world :) Any feedback is great! Thanks!

<3 Jillian
Pin It

Like it? Buy them here 

Owl #4: I love you owl painting

Perfect for Valentine's Day! Maybe I should make a free card out of it? Maybe...

Enjoy!
Like it? Buy it here


Jan 28, 2012

Owl Challenge #3: Cute Owl Painted Lamp

I've been totally slacking with posting these cute owl projects, but I thought I'd space them out a little bit to give you an "owl breather". Last week I painted a cute owl on a lamp and honestly... I can't stop staring at it!

I had this lamp I bought for $4 at IKEA and it was in the donate pile and I saw it and thought maybe I can do something to make it cuter than just a plain old red lamp. So here it is:

Pin It

Buy it here
Pin It

Thanks for reading!

Jan 25, 2012

10 Day Cute Owl Challenge: Kid's Chef Owl Painted Apron

Pin It

We are on day 2 of my 10 day cute owl challenge! I painted an apron with a cute owl chef. I hope you enjoy. To view Day 1 of the cute owl challenge, click here

Want to buy this apron? Click here

What owl art am I posting tomorrow??? Here is a hint: You can turn it on when it's dark :)

xo, Jillian

Jan 24, 2012

10 Days of Owls: Owl Painted Kids Shoes

Pin It

As you know I'm kind of obsessed with cute owls. So, I've decided that I am going to challenge myself to a 10 day Owl Challenge where I paint or make things with owls. Let's see if I can do it!

Day One: Owl Painted Kids Shoes
Pin It

Want to buy these owl painted shoes? Click here


Jan 12, 2012

DIY Stone Trivets and Coasters

Pin It

This DIY project began when my sister and I were surfing Pinterest for some great wedding ideas. We came across a picture of a pot sitting on a stone trivet. My sister jokingly said, “You should make me that for Hanukkah.” And guess what… I did. And now you can make them too!trivet step 10Materials- All materials I found at Home Depot
· Stones- I found the flat ones used for kitchen or bathroom backsplashes, this ensures that there is no unevenness in the trivet
· 2 large tiles and 2 small tiles (large for trivet, small for coaster)
· Pre-mixed grout- they come in different colors, I used beige
· Tile Adhesive
· Sponge
· Cheesecloth
· Grout float- or anything flat to spread the adhesive and grout
· Grout sealer- optional
· Felt I had lying around
Steps to making the trivets and coasterstrivet step 11. Take off all of the stones from the netting (skip this step if you bought individual stones)trivet step 22. Take your grout float and spread the tile adhesive on to the back of the tile (the less shiny side)trivet step 33. Immediately arrange your stones to your liking (make sure to press down into the tile adhesive)trivet step 44. Let dry 1-2 days (until dry)
5. Apply grout with grout float to the tile (get in all of those spaces)trivet step 56. Use a wet sponge on the tile to smooth out the grout and remove grout from top of stonestrivet step 67. Let dry for at least one day (1-3 days says the tub)
8. When grout is dry, rub the stones with a cheesecloth to clean it
9. Optional- seal the grout with grout sealer and paint brush and let sit for a few minutes, then rub off with a paper toweltrivet step 710. Cut felt into circles and glue onto each corner of the bottom of your tile, this also works with small pieces of rubber (this ensures that the trivets and coasters don't scratch your counter-tops and will not slip when placing a pot on top)trivet step 8trivet step 9I hope you enjoy these as much as my sister is!
Jan 5, 2012

Moustache Madness

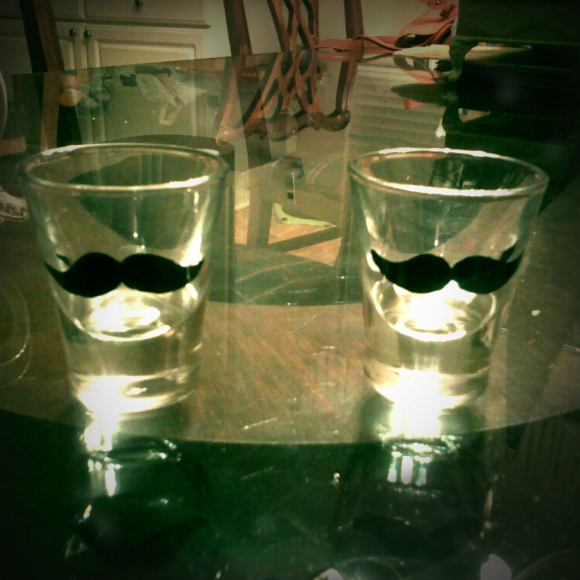
On Hannukah, I purchased some paint pens and then got so excited to paint on everything possible, I found these $1 shot glasses at King Soopers (grocery) and had a little moustache fun.

How I did it

Find a moustache you want to paint- I found mine on Pinterest and searched moustache!


I'd love to see what kind of moustache art everyone has. XO

Jan 2, 2012

DIY Canister Embellishments

Pin It

I wanted to post this sooo bad before Christmas, but I wanted it to be a surprise for Matt's mom. So... I had self control and waiting for tonight!

 They are simple to make and pretty in the end!

How I did it

Supplies
Different sized canisters from Wal-Mart (about $4 each)
Paint pens (picked them up at Michaels, you can buy them in a pack or individually)

Instructions
Well, there are no instructions! Go for it, paint your design, use stencils, and label the canisters. 
If you make a mistake, you can use nail polish remover to tidy it up a bit.


xo, j